Mature coreopsis form 2 to 3 foot clumps with erect flower stems. They're great for flower beds, borders, rock gardens, edges of walks, outdoor containers, wildflower patches and randomly sown meadow plantings. Because of their lacy foliage, threadleaf coreopsis contributes a misty texture to a perennial bed. They are also effective in containers, particularly hanging baskets. Avoid setting coreopsis among larger, taller plants, as it is not interested in competing and will die out.
Container Gardens - Coreopsis varieties do well in containers. Be sure to fill containers with good quality soilless potting mix rather than garden soil. This mix is light, well-draining and sterile, so that most disease problems can be avoided. Because the mix lacks soil and its nutrients, mix in some all-purpose slow acting granular fertilizer when you plant, or add some dilute general-purpose liquid fertilizer to the water when you water the plants. See Growing Plants In Containers and Containers For Plants in Yardener’s Tool Shed.
Attracting Wildlife: Coreopsis flowers attract beneficial insects such as hover flies (syrphid flies), whose larvae are great enemies of aphids. Butterflies and various kinds of bees, including honeybees, also visit coreopsis flowers for nectar and pollen. Birds, especially goldfinches, love to feast on the dried seed heads.
Cutting Coreopsis and Displaying Indoors: Coreopsis make excellent cut flowers. They are especially effective in informal arrangements of wildflowers or as fillers in bouquets of large blooms. Cut them early in the day and put their stems in lukewarm water immediately. Later, strip the leaves from the parts of the stems that will be underwater in their display container and arrange them. To prolong freshness add a commercial floral preservative or a citrus-based, non-diet, carbonated soda to the water. For more information see the files on Keeping Cut Flowers and Cut Flower Supplies
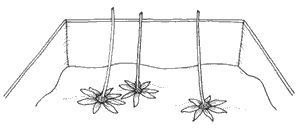
Drying Coreopsis: Preserve coreopsis flowers by drying them in sand, borax/cornmeal mixtures or silica gel. Cut flowers when they are fully open, but before the centers get large. Use sand or a mix of 4 parts cornmeal to 1 part borax, with an open container. Place flower heads with single rows of petals face down on a layer of sand or borax mix and gently trickle the granules over and around each flower. Flower heads with multiple rows of petals dry best when set upright in the drying medium. This requires that their stems be wired for stability.
 |
Be sure the sand trickles into all crevices and covers the flowers at least an inch or two deep. Do not cover the box, because they need air to dry out. Check them periodically for complete dryness before removing the flowers. The process may take 3 to 6 weeks, depending on the humidity and warmth of the surrounding air.
With silica gel, a dry desiccant powder available in craft stores and florist shops, place the flower heads face down into a container partially filled with the silica gel. The container should have an airtight lid. Single-petal types of flowers do best with this method. Gently sift more silica gel on and around each flower head, to make sure the flowers are completely covered. Then close the lid tightly. Check the flowers after 3 to 5 days. For more information see Drying Flowers and Flower Drying Supplies

