The care information provided in this section represents the kind of practical advice is available for all the plants in this web site if you subscribe to the monthly customized newsletter Yardener’s Advisor.
 |
Watering
Zinnias can cope with mild drought, but they appreciate regular watering. When watering, try to soak the soil thoroughly, but do not water so freely that puddles collect on the ground. Avoid getting moisture on the leaves which are prone to mildew. Water early in the day so that any foliage that gets wet can dry out before evening. In the summer when rainfall is sparse, try to provide about an inch of water a week from your hose or drip system so that the zinnias avoid stress which encourages disease problems. For information on products see the file on Choosing Watering Equipment
Fertilizing
In the spring when they are young, fertilize zinnia seedlings with an all-purpose slow-acting granular fertilizer that you use on all the plants on the property. Over the season it will provide steady, consistent nutrition to your zinnias. Sprinkle a teaspoon or so on the soil around each group of seedlings for the rain to soak into the soil. Do not allow it to get on the leaves. Do not overdo fertilizer. Too much nitrogen will promote excessive foliage growth at the expense of flower production.
Mulching
A 2 or 3 inch layer of some attractive organic material such as chopped leaves, wood chips or dried grass clippings spread on the soil over zinnia roots discourages weeds. This mulch also helps prevent evaporation of moisture from the soil and it harbors beneficial organisms to help protect plants from pest problems. The mulch will decompose over the summer, adding valuable organic matter and some nutrients to the soil. Add more mulch periodically to maintain a 2 or 3 inch layer over the season. For more information see the file on Using Mulch
Pruning/Grooming Zinnias
Pinch the tips off of young plant stems when they get to be about 6 inches tall to encourage branching, more foliage and more blooms. Later, when they start blooming, pinch off spent zinnia flowers. Called deadheading, this practice encourages continuous blooming and maintains a neat appearance. However, because the seeds that form in the heads of aging blossoms are favorites of small birds, consider allowing flowers on plants that are not in full public view to go to seed to attract them. Birds in and around the yard are excellent allies in the battle against pest insects.
 |
Staking Zinnias
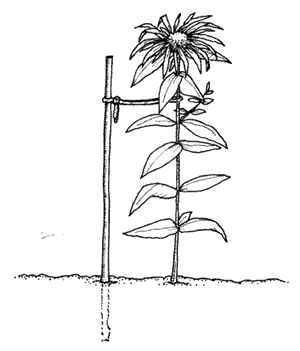
Stems of the very tall zinnia varieties will need staking after a few weeks of growth. Use sturdy sticks that are green or some other unobtrusive color and sink them into the soil next to each zinnia stem. Be sure the stakes are longer than the expected maximum height of the plant to allow for the part that is inserted in the ground. Tie a thin twine or wire twistem from the garden center around the stake and then loop it around the zinnia stem at about 2/3 the height of the plant. Leave enough slack to allow for the mature width of the stem which may reach almost 2 inches wide.
Propagating
Plant seeds indoors or, later, directly in the garden. Start zinnias indoors in peat pots and place the sprouted plants under fluorescent lights four to six weeks before the last spring frost is expected. Then they will be ready to put outside when the air and soil temperature warms up. Later in the spring plant seeds outdoors directly in the garden when the nights are dependably warm (over 50°F) and the soil is dried out after spring rains. Prepare the bed as you would for transplants. Plant seeds 1/16 inch deep and lightly cover them with soil. They will germinate in from 3 to 7 days. When the new seedlings develop their first true leaves, thin them by pulling up or clipping off small, crowded ones so that only the strongest remain at a distance of about 4 or 5 inches from each other. Once young plants are well underway, thin them again--removing even more plants so that the remaining ones are 12 or more inches apart. Dwarf types should be 6 to 10 inch apart. See Starting Plants From Seed and see Seed Starting Supplies and Equipment.

